Half a pound of tuppenny rice...

A not too serious blog about my cooking, baking and children. Sometimes rants, often not.

Saturday, January 29, 2011

My plans for this week...

My usual Saturday morning bakeathon was scuppered this morning by having a child with a sickness bug during the night. Queue lots and lots of washing and hardly any cooking!

I did manage some sausage rolls but as these take minutes it's hardly note worthy, oh and I did make Ten Ton Stew but more out of sheer laziness than anything else.

So, I feel a bit hard done by today so this week my plan is to:

1. Source a good red onion marmalade recipe and make some!

2. Make some pretty cupcakes for the lunchboxes and also for Wednesdays gossip session.

3. Be organised and make/freeze a fish pie for one of the club nights.

4. Cook the huge bit of pork I have, but maybe try a new take on it.

Monday, January 24, 2011

Cheese Straws - perfect for hungry babies!

Well probably not perfect for hungry babies, but perfect for my hungry (not so little anymore) baby. A turned 9 months the other day and is no longer interested in spoonfuls of offerings, she likes to feed herself and is quite strong willed about her tastes. A likes these because she can pull them apart and eat bits of them, plus she can hold it herself. I like them because they are easy to take out with me!

They are also fab for when something is needed quick for the children to snack on after school, I got fed up with them raiding the larder for crisps and junk because they couldn't wait 5 minutes for something to be made. This was a really easy solution. They love them dipped in sour cream!

I started making batches of cheese straws because the freeze really well and I just take a few out at a time when I know I'll be pushed for time. You can use the basic recipe and then jazz them up with poppy/sesame seeds or different cheeses if you like.

Cheese Straws


50g self-raising flour
Small pinch of paprika
25g butter
80g grated red leicester/or normal cheddar
20g grated parmesan


Preheat oven to 200C/gas 6.

Mix ingredients together, either by hand or in a food processor. It might look a bit crumbly but that's OK. Knead it all together.

Roll it out fairly thinly (about 1.5/2cm thick) onto a floured board. Cut into short strips and put on a non-stick, greased or lined tray in the oven for 10 minutes. Cool on a wire rack.


Go Karting in the freezing cold.

I have no idea where my children get it from but they are all really sporty, especially my 10 year old twin boys. We are all huge F1 fans and as most will know Jensen Button & Lewis Hamilton started off on the go kart circuits so this is the boys obsession! They are desperate to be F1 drivers, or X-C runners, or footballers, or dodgeballers or, or, or....

Saturday saw us at Buckmore Park kart circuit, in the sometimes freezing cold rain/fog/drizzle. T came 1st in 2 of his 3 races and S managed an impressive 2nd/3rd/3rd.

Saturday, January 15, 2011

Makin' whoopie..

Whoopie pies are a huge favourite in our house, they are super easy to make and a nice treat. I'm not sure they beat a good cupcake but they do come a close second!

Trying to find a recipe was the tricky part, there are lots of variations and some are better suited to certain flavours than others. The recipe posted below is one of our all time faves - double chocolate!

Double chocolate whoopie pies

280g plain flour
30g cocoa powder
1tsp baking powder
2tsp bicarbonate of soda
150g soft brown sugar
60ml sunflower oil
125ml Crème Fraîche or buttermilk works well too
1 large free range egg
60ml boiling water


Preheat the oven to 200°C.

Pop the sugar into a large mixing bowl and give it a stir to break up any lumpy bits.

Sift together the flour, cocoa powder, bicarbonate of soda and baking powder. Then add to the sugar and mix it up.

In a bowl whisk the egg, crème fraîche/buttermilk and oil. Add the boiling water whilst you are whisking and then quickly stir the liquid into the sifted flour mixture. Be mindful the it should look like a thick batter, don't over mix it.

Leave the batter to cool down for approx 5 minutes. Whilst waiting for it to cool down prep the baking tray, you can get a reusable non stick liner that works well for this or treat yourself to a whoopie pie tin for more uniform pies.

With a spoon pop a small scoopful onto the liner and pat gently. The batter should be about 5 cm round, they do expand and spread so bear this in mind when you are leaving space between the whoopies.

Put them in the preheated oven for 10 - 12 minutes. You should be looking for a soft almost half cookie/half moon cake. Once cooled down they will have a bit of a crunch on the outside but the inside will be soft and cake like. Put the cooked whoopies onto a cooling rack to finish cooling down.

Once cool match up 2 like size whoopies and fill the middles. Traditionally they have been filled with marshmellow but we prefer buttercream.

So to make the chocolate buttercream

4oz unsalted butter
6oz icing sugar
3oz cocoa powder
Milk

Mix together the butter, icing and cocoa powder. Beware it will go everywhere! Add small amounts of milk until the dry powder has completely mixed and gone smooth. Dip finger in and taste - if you go 'mmmmmm' then it's just right!

Enjoy xx


Ten Ton Stew.

Ten Ton Stew - named so in our house because after you've eaten loads that's how much you feel like you weigh and also because it feels like that's how many vegetables are in it!

This recipe is one that my Nan makes, my Mum makes and now I make. We've had to adapt it over the years because certain things went out of fashion or just became impossible to source.

For example, when my Nan started making this stew you could get oxtail squares. Which were basically like the jelly stocks now but made from oxtail stock. When I'm being particually resourceful I save the meat stock from a Sunday Roast and pour into ice cube trays, freeze and then pop into freezer bags to use in stews. But in this stew I cheat like crazy and although it sounds pretty rank it does taste VERY good.


Ten Ton Stew & dumplings

600g diced beef
1.5kg mix of carrots, parsnips and swede - peeled and cut into chunks
A punnet of button mushrooms
Tin of butter beans/baked bins/any!
2 onions, sliced
1 leek, sliced
Beef stock
Oxtail soup
Boiling water - approx 3 litres

Dumplings
6oz Atora suet
40z Plain flour
Pinch of salt
Cold water


Start by prepping the vegetables, by this I mean peeling and either slicing/cutting. That's the hard bit done!

In a pan pop in the beef and sliced onion, quickly cook until the beef has browned. Transfer to a slow cooker or a big, big casserole dish. To give some idea my slow cooker is 6.5 litres and I base this recipe on almost filling this up!

Layer the beef and onion onto the bottom and then cover in the chopped vegetables, I tend to try and put the swede towards the bottom because it needs more time to cook. By loading the veg on top on the meat it ensures that the meat is always in the stock and therefore gets lovely and tender.

Having put all the vegetables in the slow cook, I then add the beans and give a gentle mix. Finally I add the stock and the boiling water.

I leave to cook for as long as possible, ideally at least 5 hours. What generally happens is that I prepare this in the morning and then go out and by the time we get back in the evening it's pretty much ready.

Approximately 35 minutes before the end of cooking I add the 'secret' ingredient. By this I mean the oxtail soup! It's crazy but the best we have found is actually oxtail cup a soups - and I add 5 sachets! This thickens the stock up and adds a really lovely meaty flavour. My Mum also swears that this is the best replica of the oxtail squares from years ago.

We then make dumplings out of suet, flour, water and salt. They are very easy and all you do is combine the suet and flour, add a pinch of salt and then add the cold water until the mixture combines. The less you touch the mixture the better, I tend to use a fork and then just pick them up at the end to quickly form the shape. Pop them onto the top of the stew. 20 minutes later they should have doubled in size and be fluffy and round.

Serve with boiled potatoes - boiled, not mash! The boiled potatoes soak up the liquid and taste much better.


Just put the dumplings in - they easily doubled in size after 20 mins!

Thursday, January 13, 2011

Cheeky baby Bert!


The last couple of days have been pretty manic with the return to school clubs and the fact that we are all struggling to get up early!

This video was shot on Sunday - Baby Bert had just enjoyed a stuffed roast loin of pork with all the trimmings. She was still hungry though and polished off extra carrots and broccolli before wolfing down rice pudding :)

Sunday, January 09, 2011

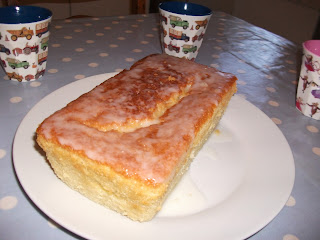
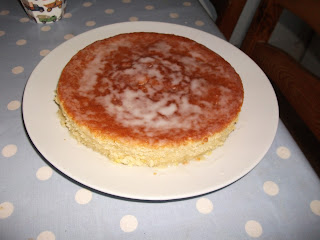
Lemon Drizzle Cake - oh how I love you!

There really is something yummy about a lemon drizzle cake, I think it's because it's that slightly sharp taste of the icing. Today I made 2 lemon drizzles, one loaf and one round cake. I think I prefer the look of the loaf so the plan is definately to perfect that.

I can take no credit for the following recipe at all - it was given to me and I find it pretty good so have no need to change it! I might play about with it during the Summer, maybe swopping the lemons for fresh raspberries or even mexican limes. I keep trying to remind myself to get some poppy seeds too - I'll have to source that for next time!


Lemon Drizzle Cake


7oz caster sugar
4 eggs
lemon zest from one large lemon
4 tablespoons lemon juice
7oz plain flour

2 teaspoons baking powder
150ml sour cream

150ml sunflower oil

4 tablespoons icing sugar
3 tablespoons lemon juice, or to taste

Preheat the oven to 180oC/ Gas 4. Grease the bottom/sides of a 8-inch cake pan, I find the loose bottom ones best or if you are making a loaf then a 2lb tin works well.

Sift together the flour, baking powder and caster sugar.


In my lovely kitchenaid (any old whisk will do though ;)) I mix together the wet ingredients. So I add the eggs, one at a time, beating well. Then the lemon zest, lemon juice, sour cream and oil. Add to the dry ingredients, stirring until well incorporated.

Pour the mixture into the cake pan and bake for 45/60 minutes, or until a cake tester inserted in the middle comes out clean and the top is golden brown.


Meanwhile make the icing : pop the icing sugar and lemon juice into a saucepan and heat until it just starts to bubble and looks a bit like a clear syrup.
When you have taken the cake out of the oven prick the surface with a skewer or something small and sharp (knives work well when skewers hide in the drawer!). Brush the lemon syrup onto the cake, don't let it pool anywhere as it can get soggy ( I speak from experience!). Let cool in the pan for 5 minutes and then pop onto a rack to cool completely.


Saturday, January 08, 2011

You'll never be boney if you eat macaroni...

Mac and cheese is a HUGE favourite of mine, it reminds me of childhood and all things comforting. I really do like the Jamie Oliver version, Killer Mac'n'cheese so I decided to have a play around with it and also try and remember my childhood versions.

I always make a lot of this as I like to stick some in the freezer for the days when we have clubs on and I don't have time to make anything tasty. It's really quick and easy to make, plus you can make in the morning and then reheat in the evening when you need it.

Quattro fromage macaroni and bacon - enough for 6 plus extra to freeze (or scoff the next day!)

1 1/2 pints of milk
1 big onion - peeled
Whole black peppercorns - approx 10
A bayleaf or 2
500g macaroni
200g of bacon lardons or diced pancetta/streaky bacon/normal bacon/WHATEVER!
3 oz butter
2 and a bit oz plain flour
5 tbsp of cream cheese (philly or similiar)
Approx 4 oz mature cheddar
Approx 4 oz red leicester
Approx 4 oz emmental
Tsp of nutmeg - ground
Pepper
Small bag of ready salted crisps, crushed.

First things first, put on the water for the pasta now. A big pan of slightly salted water and bring to the boil.

Then add the milk, onion (peeled but whole), bayleafs and peppercorns to another saucepan and bring to the boil. Put to one side and leave for 10 mins or so.


Pop the macaroni into the pan of water, stir and leave to cook for approx 10/15 minutes.

Next fry up the bacon lardons, I never add extra oil/fat because I prefer to let them cook in their own juice. Start off on a slow heat until the bacon starts to sweat and then give a stir and let it cook until just starting get a sticky brown colour on them. I find the stickiness adds more flavour to the bacon.

By now the milk should have cooled down enough, use a sieve and take out the onion/bayleafs/peppercorns until you are just left with the milk. So in another pan add the butter and heat until melted, stir in the flour until it's smooth. I use a whisk because I get distracted often and find this brings it back to a smoothness if I start to lose it! Keep the flour/butter mix on the heat for about another minute and then take off and add a little of the milk. Pop back onto the heat and keep whisking while adding in the remaining milk, continue whisking until the sauce starts to really thicken up (on a medium heat it will be about 3 minutes or so). Once thickened remove from the heat and add the cream cheese, nutmeg and pepper to taste. Finally stir in the grated cheeses but keep some back to sprinkle on the top.

Drain the macaroni and put in a big roaster tray or suitable oven proof dish. Stir in the lardons and the cheese sauce. Make sure all the macaroni is covered. Then sprinkle the crushed crisps onto the top, followed by the remaining grated cheeses.If you are eating straightaway then pop it under the grill until the cheese has turned golden brown. Or if eating later then chill it down and then pop in the fridge. You can reheat later by popping into the oven on gas mark 6 for approx 35 minutes or until bubbly and the top is golden brown.

We really like the contrast between the crispy topping and the smoothness of the cheese sauce. Yummy!


Friday, January 07, 2011

Picky, sticky, definately not icky sausages.

Yummy, scrummy butchers sausages. They deserve more than the average banger, although to be fair they taste pretty good just as they are. Whenever I go the butchers I always feel like I'm bringing home not just a bargain but also better quality meat.

The sausages I buy are a minimum of 89% pork, they don't shrink and have very little fat. My favourite thing is to glaze the sausages. I actually think they taste better cold but they rarely last that long in our house. So for a party/buffet/bbq you can make these in advance and leave them to chill down before serving.

Sticky glazed honey mustard sausages - serves 6

12-16 sausages or small cocktail sausages if for a party
Approx 4/5 tbsp of clear honey - add more or less to taste
Approx 4/5 tbsp of wholegrain mustard - again more/less to taste
A couple of dashes of soy sauce

Pop the sausages into a roasting dish and cook for approx 20 mins until starting to brown.

Mix together the honey, mustard and soy sauce in a bowl and pour into the roasting tin with the cooked sausages. Jiggle the sausages around until they are fully coated and then return to the oven for a further 10/15 minutes. If you remember jiggle them about a couple of times during cooking, they will start to darkern and that's when you pull them out.

Serve with anything you fancy! We like it with just plain mash and baby corn/sugar snap peas. Nom, nom!


Thursday, January 06, 2011

While I remember - Herman Cake.

Just before Christmas I was given a 'Herman' with a set of instructions on how to look after him. After a spot of confusion I realised that 'Herman' was in fact a cake batter like a sour dough cake and that you looked after him in order to create a naturally occurring yeast. Below I have added a little bit about the history of the cake and also the ingredients and instructions on how you can create your own. I never started the original so have had to adapt the recipe that I found online to fit in with the instructions that I was given.

The Herman cake is known by a few different names (the Amish cake, the friendship cake to name a couple) and comes from days gone by when yeast was expensive and hard to source. You made the 'starter' recipe below and by following the instructions you could make this clever naturally occurring yeast, this could then be passed on to others so that they had their own supply. It could be passed back and forth between friends or, in theory, one original Herman could carry on in the same house for years!

Original Herman cake starter

2 cups plain flour
2 cups sugar
2 cups water or milk

Stir ingredients together and place in a plastic bowl and cover with a clean tea towel, this will capture the yeasts that are around locally.

Stir once a day for 20 days.

After 20 days add another cup of flour, sugar, milk and then stir, then 4 days later add the ingredients again and then split into 4. Follow instructions below!

The Instructions - or how to care for Herman

Hi, my name is Herman.

Do not put me in the fridge and make sure that I'm not too hot, I do like to be warm though. Put me in a large bowl so that I can grow, but do not cover me with a lid, just a clean tea towel. I need to breathe. I should also bubble - this shows I'm breathing. If I stop breathing - I'M DEAD!

Day 1: Herman arrives

Day 2 and 3: Stir Herman 2-3 times a day with a wooden spoon

Day 4: Herman is hungry, please feed him with : 200g sugar, 125 g plain flour, 200ml milk. Stir well.

Day 5,6,7,8: Stir 2-3 times a day

Day 9: Herman is hungry again. Please feed him with: 200g sugar, 125 g plain flour, 200ml milk. Stir well.


Divide me into four. Pass me on to three of your friends and keep one part for yourself. You can either start the process of looking after me again or make me into a delicious cake. If you do want to eat me *gulp* then try the following:

Add to the part you have kept:
150g melted butter
3 eggs
250g plain flour
100g brown sugar
4 tsp baking powder
1 tsp cinnamon
2 apples, peeled, cored, grated
100g dried fruit.

Give Herman a good mix and pour him into a large greased tin, or 2 smaller ones. Make sure you only fill to about 3/4 full because Herman will rise and chances are overflow. No-one likes oven cleaning so be warned! Sprinkle the top with brown sugar and bake at 15C, Gas Mark 2 for 1 and a half hours.


Then scoff.

Labels:

Happy New Year!

My first blog of the New Year, indeed my first blog on my sparkling new laptop. My last one has been handed over to my children who I thought would appreciate it but sadly think that it's slow. 3 years old in tech terms is what, 75 in human years?

I was a very lucky recipient of a gorgeous purple kitchenaid artisan mixer for Christmas and I feel I must do it justice but keeping up with my blog and documenting all the wonderful successes (or not!) that it will give me (fingers x'd).

So far I have made some scrummy cakes with it, notably a divine lemon drizzle cake and more recently a carrot and walnut cake. My plan for future blogs is to include the recipes I use and also pictures as I go. Not sure I will always remember but that is at least the idea.

Tonight I plan on making a spaghetti bolognaise. I'm making this because a) I can make it in my sleep b) I hate it c) I'm allergic to tomatoes d) I'm having dinner with friends and therefore will not be tempted to pick at it!

I use a pretty basic recipe because it's my children's favourite dish and also because that way it's a very quick to make.

Spaghetti Bolognaise - feeds 6 (or more given my children are prone to 2nd's!)

500g spaghetti - dried or fresh
800g mince beef steak
2 medium brown onions - sliced
2 tins of chopped plum tomatoes
An oxo cube
A pinch or 2 of mixed herbs or use a fresh mix of basil/mint/oregano
2 cloves of crushed garlic
2 carrots diced
Splash of red wine
A spoonful of tomato puree
A sprinkling of parmesan if you fancy

Firstly, stick on a big pan of slightly salted water. Bring to the boil.

While the water is coming to the boil put the mince into a pan and add the sliced onion. Cook until browned. Drain off any remaining fat.

Add the 2 tins of chopped tomatoes and the spoonful of tomato puree. Give it a stir and pop in the carrots, garlic and oxo cube.

By now the water should be boiling, pop in the spaghetti and give a quick swirl so it doesn't stick.

Return to the pan of bologanise and add a splash of red wine and then the herbs. By the time the spaghetti has cooked (approx 10/15 mins) the sauce should be ready too.

Plate up and sprinkle on some parmesan.

Enjoy with some crusty bread :)

This is an easy peasy recipe, it can be jazzed up with some diced pancetta or kidney for a more adult taste but I've yet to find children who don't adore this for a quick supper.